
Understanding Security and Permissions in Geoserver
Summary
This tutorial provides a brief introduction to security and permissions in Geoserver. For more in-depth discussion, consult the Geoserver official documentation here.
1. Users, roles, and groups in Geoserver
Geoserver has a granular, role-based permission system to secure workspaces, data, and services. Users, roles, and groups are defined as follows:
- Users are named login users (e.g. Sara). Users are members of roles.
- Roles are groups of users that must be differentiated based on some internal, organizational policy. For example, GIS administrators, read-only users, data editors.
- Groups are groups of roles. For example, read-only users and data editors could be grouped into a more generic group called “staff”.

IMPORTANT: Setting up users, roles, and groups does not secure data assets on its own. These permissions must then be used to secure data and services with specific policies. See Sections 5.2 and 5.3 for details.
2. Possible User/Role/Group Configurations
The following outlines a few possible scenarios for user/role/group management from a simple read-only setup to more complex, multi-role and multi-group setups.
Scenario 1: Read-Only Roles for all users Except Administrators
In this scenario, a small organization has 5 aerial photos that need to be shared within the organization. There will be no access to data assets from outside the organization.
- User Configuration: each user is created with a username and password.
- Role Configuration: The default ADMIN role is unchanged and a new role called STAFF is created.
- Group Configuration: there is no need to create any groups.
Scenario 2: Department-Based Roles
In this scenario, an organization has multiple departments that each require access to specific data and services.There is also a need to grant all staff access to common layers.
- User Configuration: each user is created with a username and password.
- Role Configuration: The default ADMIN role is unchanged and new roles are created for each department, namely PLANNING, FORESTRY, PUBLICWORKS, PARKS.
- Group Configuration: All departmental roles are added to a group called STAFF. This will make it easier to grant all staff access to common workspaces.
Scenario 3: Project-Based Roles
In this scenario, a mining company runs eight projects concurrently but staff should only be able to see data within specific projects (e.g. Jeff only works on Project_1 and Project_2, so he should not be able to see Project_3). There is also a need to grant all staff access to common layers.
- User Configuration: each user is created with a username and password.
- Role Configuration: The default ADMIN role is unchanged and new roles are created for each of the three projects, namely PROJECT_1, PROJECT_2, and PROJECT_3.
- Group Configuration: All project roles are added to a group called STAFF. This will make it easier to grant all staff access to common workspaces.
Geoserver has a number of default OGC-compliant service capabilities, including WFS, WMS, WMTS, TMS, etc. Permissions can be set for each service individually or all services can have the same security policy. For example, a very common policy is to only allow named roles to access all services. To create this policy, follow the instructions below:
- In Geoserver, click on Security > Services.
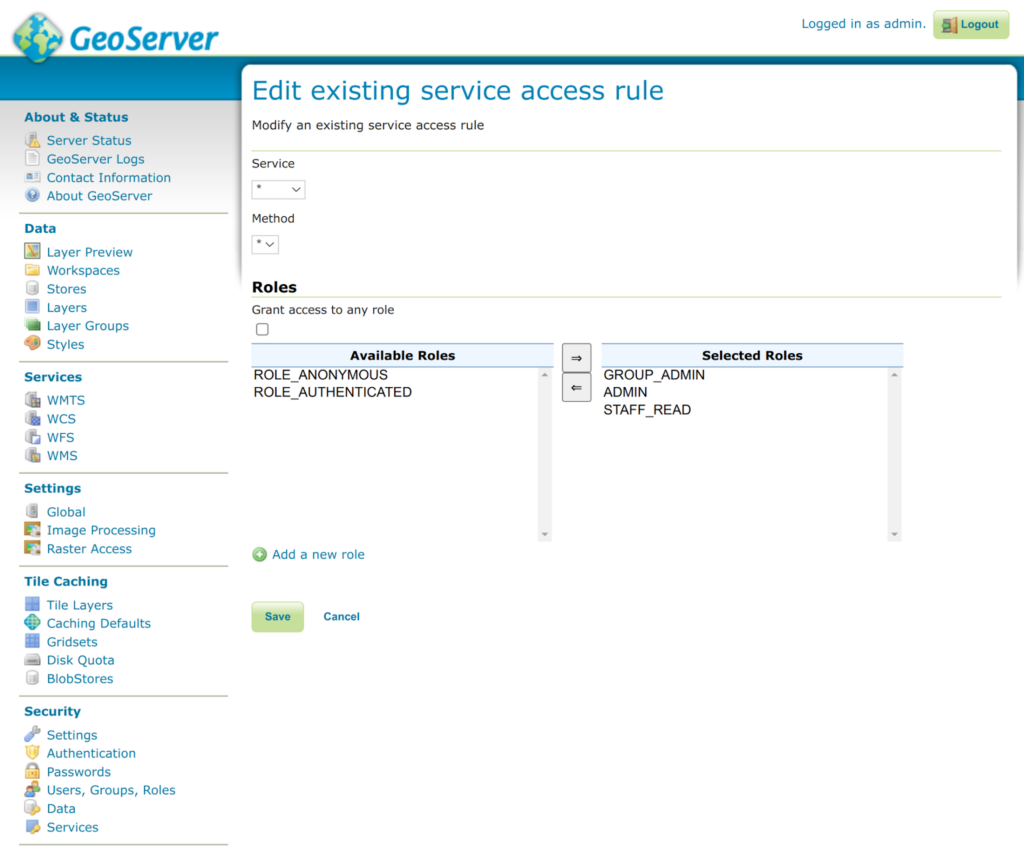
- By default, Geoserver is set up with all services open. This means that anyone can access any service and any published data on the service. To change this, click on the rule path called *.* (meaning all services and all methods). This will open the Edit existing service access rule screen.
- In the Edit existing service access rule screen, deselect “Grant access to any role” if selected.
- In the Edit existing service access rule screen, add GROUP_ADMIN, ADMIN, and any other roles to the Selected Roles section.
- Click Save and the rules list will be updated showing that only the specified roles have access to all services.
3. Service level security in Geoserver
Geoserver has a number of default OGC-compliant service capabilities, including WFS, WMS, WMTS, TMS, etc. Permissions can be set for each service individually or all services can have the same security policy. For example, a very common policy is to only allow named roles to access all services. To create this policy, follow the instructions below:
- In Geoserver, click on Security > Services.
- By default, Geoserver is set up with all services open. This means that anyone can access any service and any published data on the service. To change this, click on the rule path called *.* (meaning all services and all methods). This will open the Edit existing service access rule screen.
- In the Edit existing service access rule screen, deselect “Grant access to any role” if selected.
- In the Edit existing service access rule screen, add GROUP_ADMIN, ADMIN, and any other roles to the Selected Roles section.
- Click Save and the rules list will be updated showing that only the specified roles have access to all services.
4. Data level security
Data level security allows administrators to restrict access to specific workspaces, layers, and layer groups by creating multiple access rules. Each rule is also defined by the access mode, which can be set to the following:
- Read: grant users the right to read the specific data source.
- Write: grant users the right to write to the specific data source.
- Admin: grant users the right to administer the specific data source.
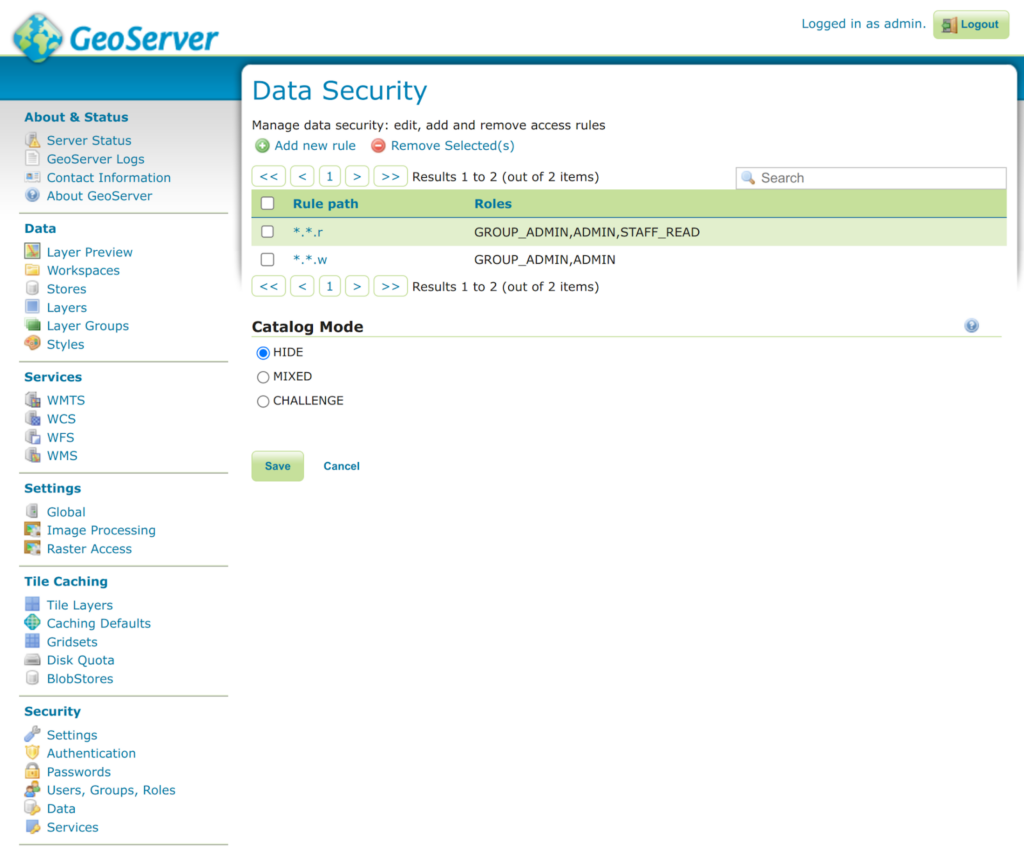
A basic configuration is to have two rules, one to allow read access for all roles and another rule to restructure write access. Note that by default there may be some rules created in Geoserver, which can be modified or deleted to create this basic configuration.
- In Geoserver, click on Security > Data.
- Remove or modify any existing rules so you can create new ones. Geoserver will throw specific error messages if rules conflict. Read the error messages carefully.
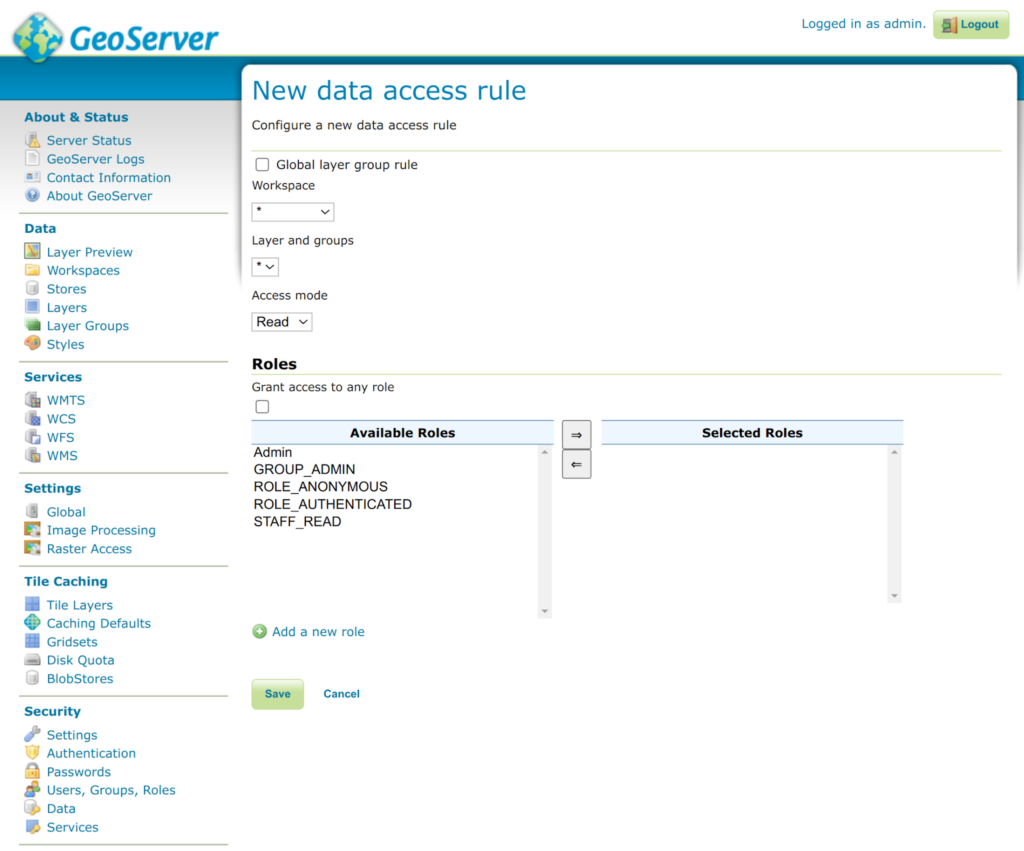
- Click Add new rule.
- On the New data access rule page, set the following:
- Workspace variable to *
- Layer and groups variable to *
- Set Access mode to READ (this will create the read-only access rule).
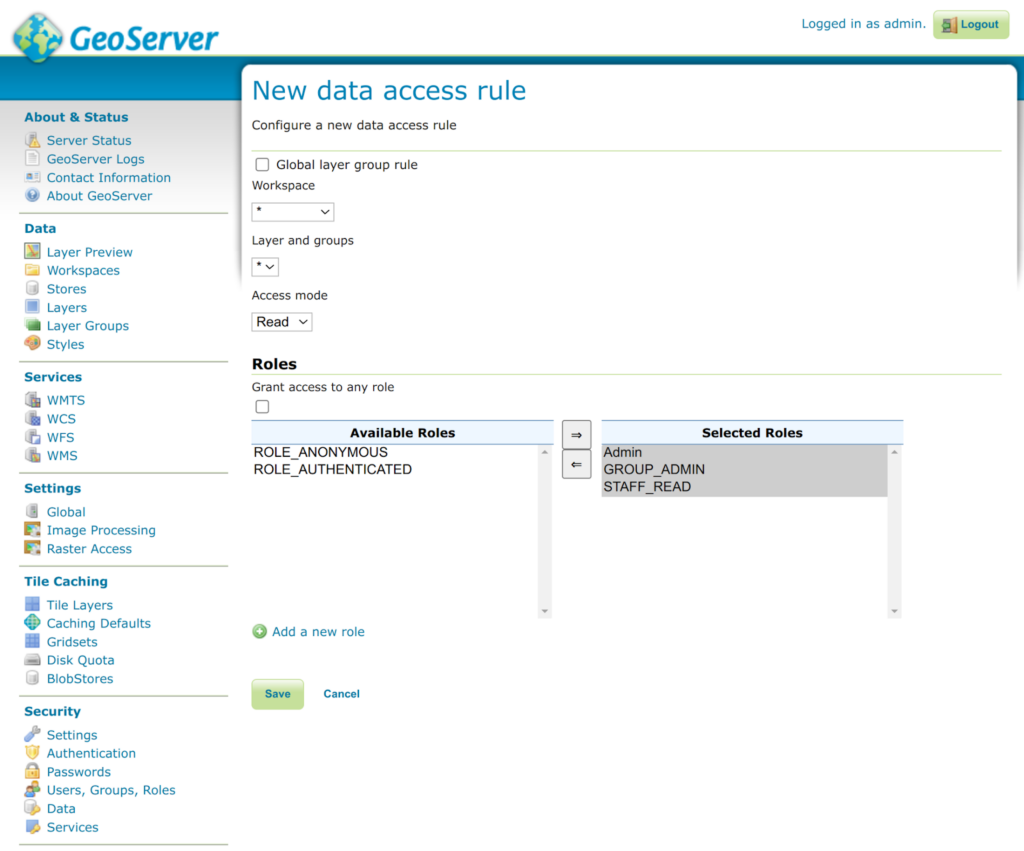
- Under Roles, deselect “Grant access to any role” if selected, and then slide Admin, GROUP_ADMIN, and any other roles you created previously into the Selected Roles section.
- Click Save. This will create the READ access rule.
- Click Add new rule.
- On the New data access rule page, set the following:
- Workspace variable to *
- Layer and groups variable to *
- Set Access mode to WRITE (this will create the read-only access rule).
- Under Roles, deselect “Grant access to any role” if selected, and then slide Admin and GROUP_ADMIN to the Selected Roles section. Do not add any roles that should not have WRITE access to all data.
- Click Save. This will create the WRITE access rule.
- Note that in the examples below, the STAFF_READ role was only added to the read-only data access rule.

5. Security Setup Best Practices in Geoserver
The following are some best practices to follow when setting up security rules and policies in Geoserver.
- Create roles and groups that reflect how the Geoserver will be used. If there will only be read-only users for all data, there is no need to create multiple roles. There is no need to create a complex, highly granular set of access rules if everyone will simply read the data.
- Always restrict data access for ALL data unless the Geoserver will allow public read-only access. At minimum, restrict read and write access to specific roles.
- Always restrict access to all services. This will prevent public access to the getCapabilities requests and therefore further help to hide the data list.
- Only open the services that you intend to use. If you only plan to use WMS, then only allow access to this specific service. However, you can always create a second rule to allow administrators access to all services.
How can we help?
Contact us today to schedule a free consultation with a member of our team.