
Manage PostGIS Databases in QGIS
In this tutorial, you will create the basic structure of an enterprise spatial database. It will have schemas for each major category of data, such as transportation and hydrology. You will also learn how to create, rename, edit, and move tables in the database using the QGIS Browser Panel and DB Manager.
What You’ll Learn in this Tutorial
- How to manage schema using the DB Manager, Browser Panel, and SQL.
- How to create, rename, edit, and move tables using the DB Manager, Browser Panel, and SQL.
Prerequisites
- Install the latest QGIS LTR here.
- Access to a PostgreSQL database server with permissions to create databases.
- The PostGIS extension installed on the PostgreSQL Server.
Task 1: Create a database for this tutorial
- In PGAdmin4, create a new database for this tutorial called manage_pg_in_qgis
- Connect to the manage_pg_in_qgis database and add the PostGIS extension by executing the following SQL statement:
CREATE EXTENSION postgis;Task 2: Create Schemas using the Browser Panel
In this task, you will create four schemas using the QGIS Browser panel.
1. Open QGIS and connect to the database you will use for this tutorial.
2. Expand the database in the Browser Panel and note that the only schema available is the “public” schema.

3. Right-click on the connection name and click on New Schema…
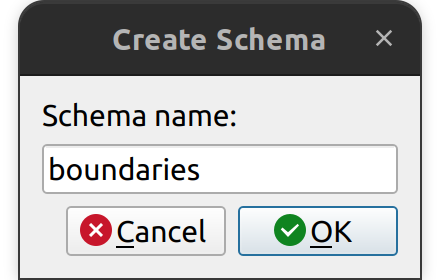
4. In the Create Schema dialog box, enter the word “boundaries”and click OK.
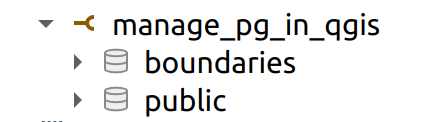
5. You should now see two schemas in the database (a refresh may be required).
6. Repeat steps 1 to 4 to create the following schemas:
- building
- forestry
- hydrology
Task 3: Create Schemas using the DB Manager
It is also possible to create schemas using the DB Manager. Ensure that you have the Database Toolbar turned on and open the DB Manager
1. Ensure that the Database Toolbar is turned on and then open the DB Manager.
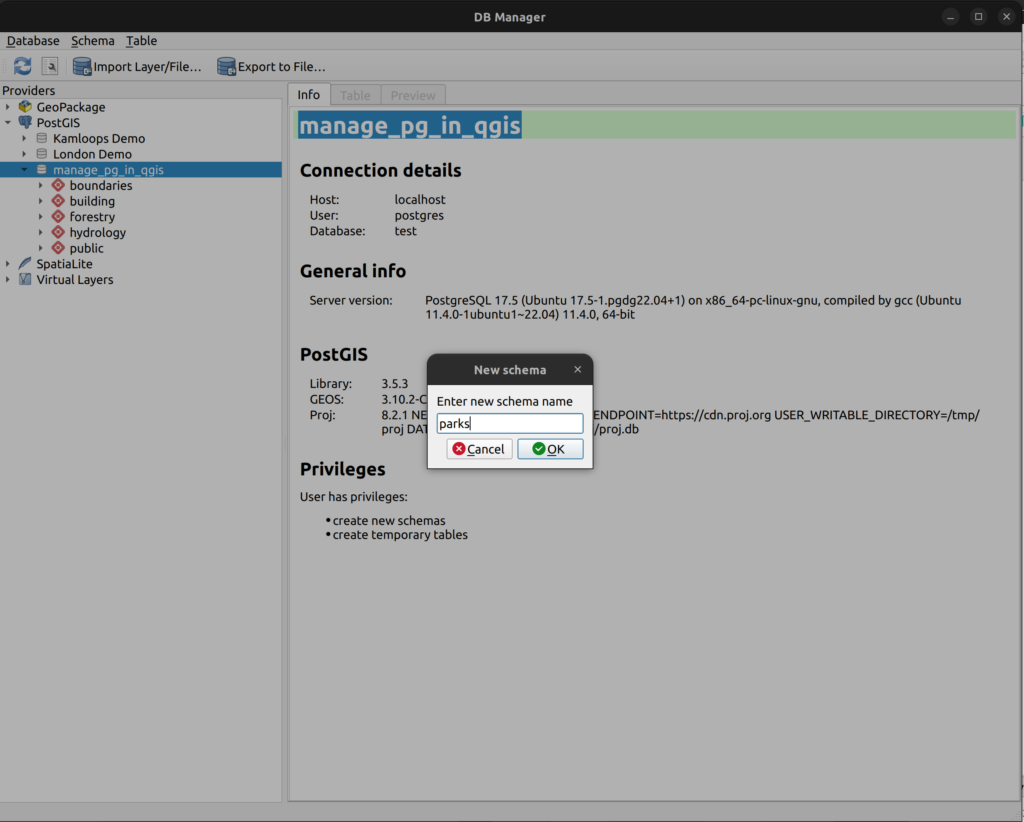
2. Expand the manage_pg_in_qgis database. You should see all the schemas created in Task 2.

3. On the top menu in the DB Manager, click Schema then Create Schema…
4. Enter the word “parks” in the New schema dialog box and click OK.
5. The parks schema will now appear in the database on the left panel.
6. Repeat steps 1 to 4 and create the following schemas:
- society_and_culture
- tourism
Task 4: Create schemas using SQL
It is possible to execute SQL queries using both the Browser Panel and the DB Manager. In this task, you will create two schemas using SQL statements executed using the Browser Panel.
1. In the Browser Panel, expand the manage_pg_in_qgis database.
2. Right-click on the database connection and click on Execute SQL.
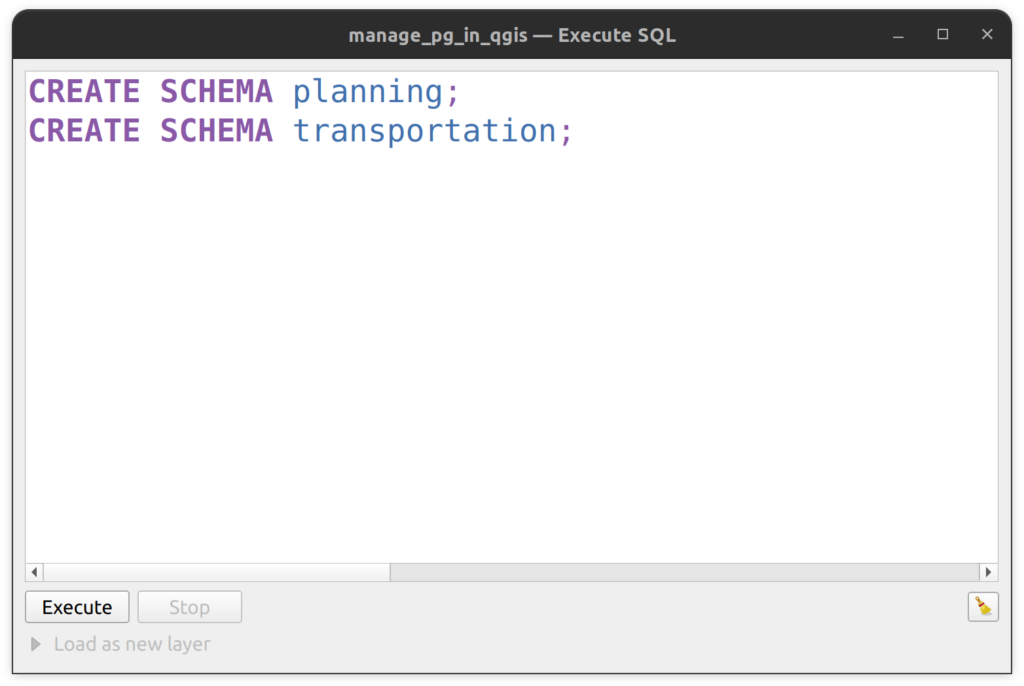
3. Execute the following SQL statement:
CREATE SCHEMA planning;
CREATE SCHEMA transportation;
4. Click Execute. Refresh the DB connection and the the new schemas should appear.
Task 5: Rename schemas using the Browser Panel
Occasionally, a schema needs to be renamed. However, such a change should not be taken lightly as it can break connections in QGIS projects, Geoserver, and any other service that relies on the database tables. In this task, you will change the name of two schema using the Browser Panel.
1. In the QGIS Browser Panel, expand the manage_pg_in_qgis database.
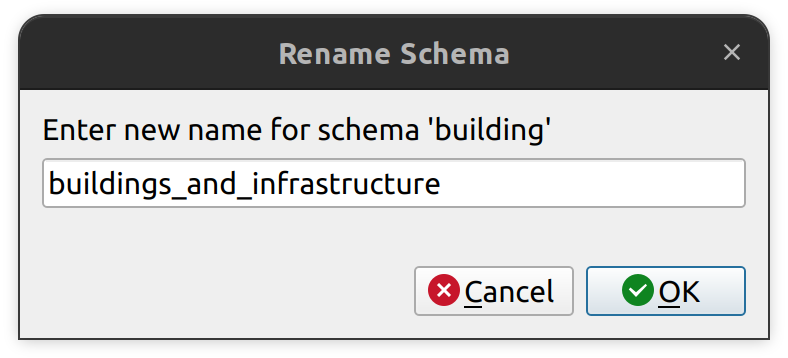
2. Right-click on the buildings schema and click Schema Operations > Rename Schema…
3. In the Rename Schema Dialog Box, enter buildings_and_infrastructure as the new name and click OK.
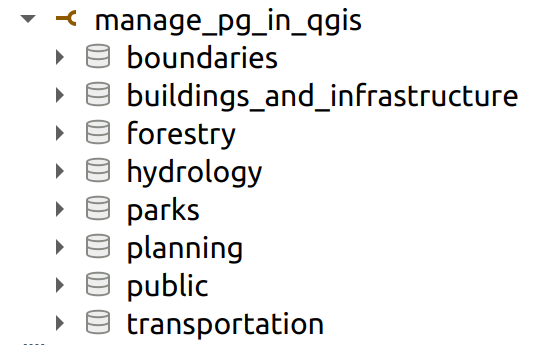
4. The schema will be renamed automatically in the Browser Panel (no refresh necessary).
5. Do the same for the parks schema and rename it parks_and_recreation.
Task 6: Create a Table using the Browser Panel
1. In the QGIS Browser Panel, expand the manage_pg_in_qgis database.
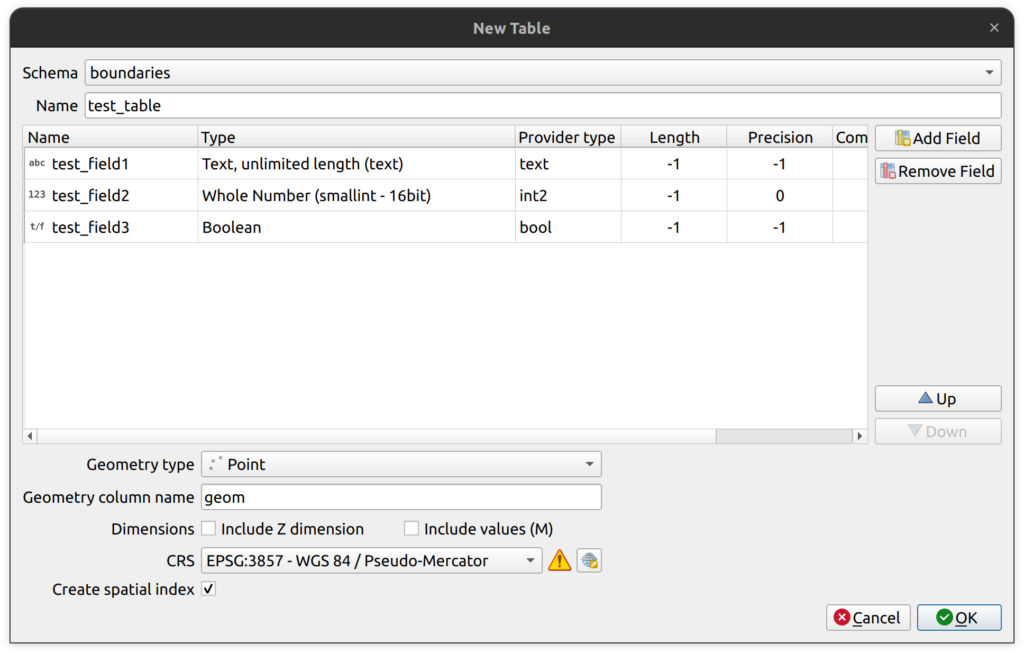
2. Right-click on the boundaries schema and click New Table…
3. Enter the following parameters:
- Name: test_table.
- Add a field called test_field1 and make it a text type.
- Add a field called test_field2 and make it a integer (int2) type.
- Add a field called test_field3 and make it a boolean type.
- Geometry Type: Point
- CRS: EPSG:3857
- Use default values for all other parameters and click OK.
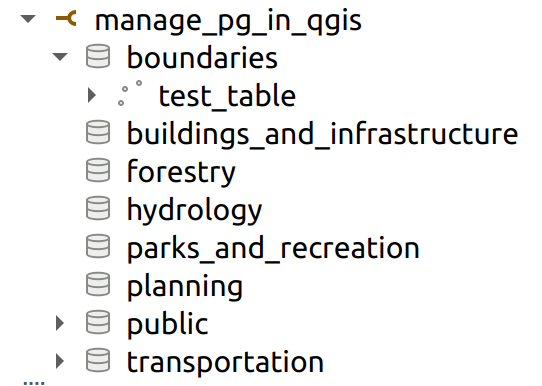
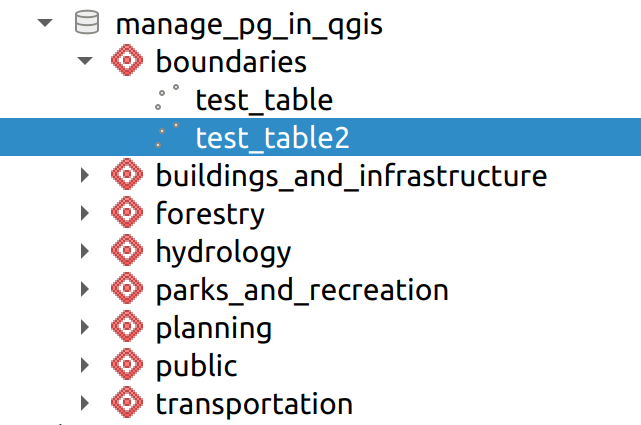
4. You should now see the new table test_table in the boundaries schema.
Task 7: Create a Spatial Table using SQL
It is also possible to create tables in PostgreSQL using SQL statements. In this task, you will create another table by executing a SQL statement.
1. In the QGIS Browser Panel, expand the manage_pg_in_qgis database.
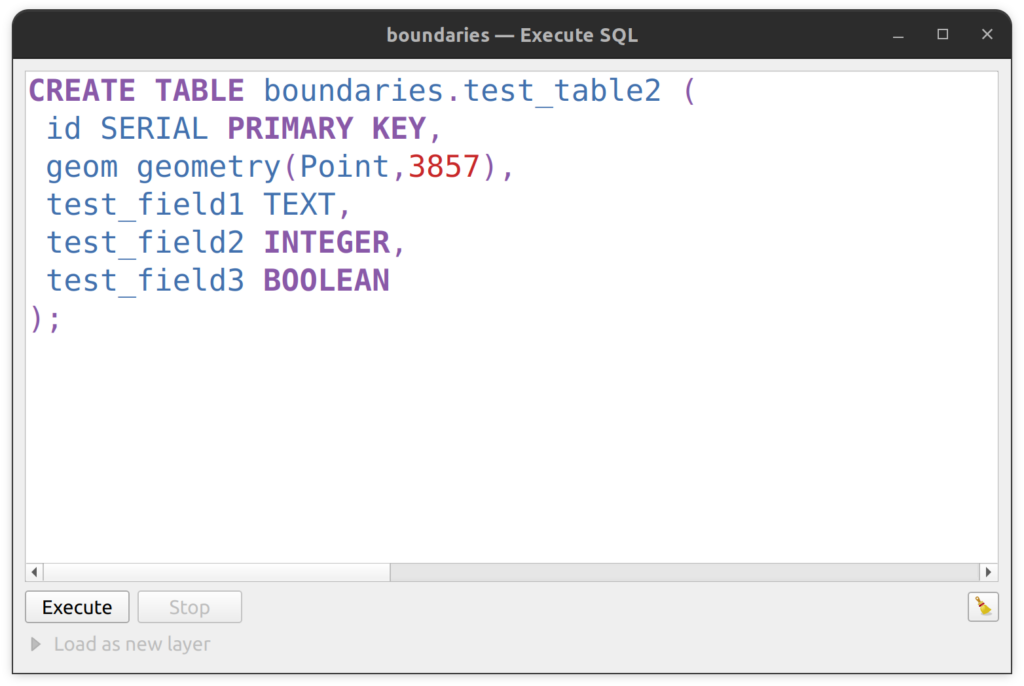
2. Right-click on the boundaries schema and click Execute SQL…
3. In the Execute SQL dialog box, enter and execute the following statement.
CREATE TABLE boundaries.test_table2 (
id SERIAL PRIMARY KEY,
geom geometry(Point,3857),
test_field1 TEXT,
test_field2 INTEGER,
test_field3 BOOLEAN
);
Task 8: Move a table to another schema
Although it is possible drag and drop a table between schemas using the Browser Panel, as of the time of writing this tutorial that will simply insert a copy of the table into the destination schema. Therefore, this is not the recommended approach to actually MOVE a table from one schema to another. Fortunately, the DB Manager makes moving tables between schemas quite easy.
IMPORTANT: Just like renaming a schema can break links to tables, moving a table can also break links to it in QGIS projects and any external software (e.g. Geoserver, LunaMap, etc.). Move table cautiously.
1. Open the QGIS DB Manager, expand the mange_pg_in_qgis database, and expand the boundaries schema.
2. Click on the test_table2 to select it.
3. On the top menu, click Table > Move to Schema > planning.
4. Expand the planning schema and note that test_table2 is now in that schema.
Task 9: Rename a table using the Browser Panel
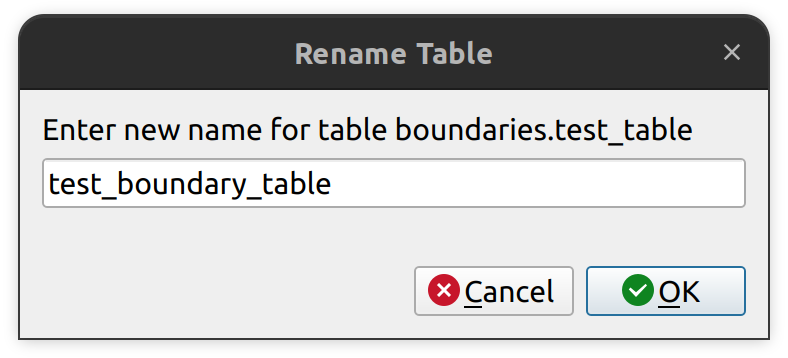
You can also use the Browser Panel to rename a table in a PostgreSQL database. In this task, you will rename the table test_table in the boundaries schema to test_boundary_table.
1. Open the QGIS Browser Panel, expand the mange_pg_in_qgis database, and expand the boundaries schema.
2. Right-click on the test_table and click on Table Operations > Rename Table
3. In the Rename Table dialog, enter the new name as test_boundary_table and click OK.
4. Automatically, the table name will change to test_boundary_table in the boundaries schema.
Task 10: Modify an existing table structure
Using the DB Manager, it is possible to completely modify a table structure, including creating, deleting, and changing table fields. In this task you will (1) change the name of an existing field and (2) add a new field.
Task 10.1: Change the name of a column
1. Ensure that the Database Toolbar is turned on and then open the DB Manager.
2. Expand the manage_pg_in_qgis database and expand the boundaries schema. You should see one table called test_boundary_table. Click on it.
3. With the test_boundary_table selected, on the top navbar, click Table > Edit Table.
4. Click on the field called test_field3 and then click the Edit column button at the bottom on the dialog box.
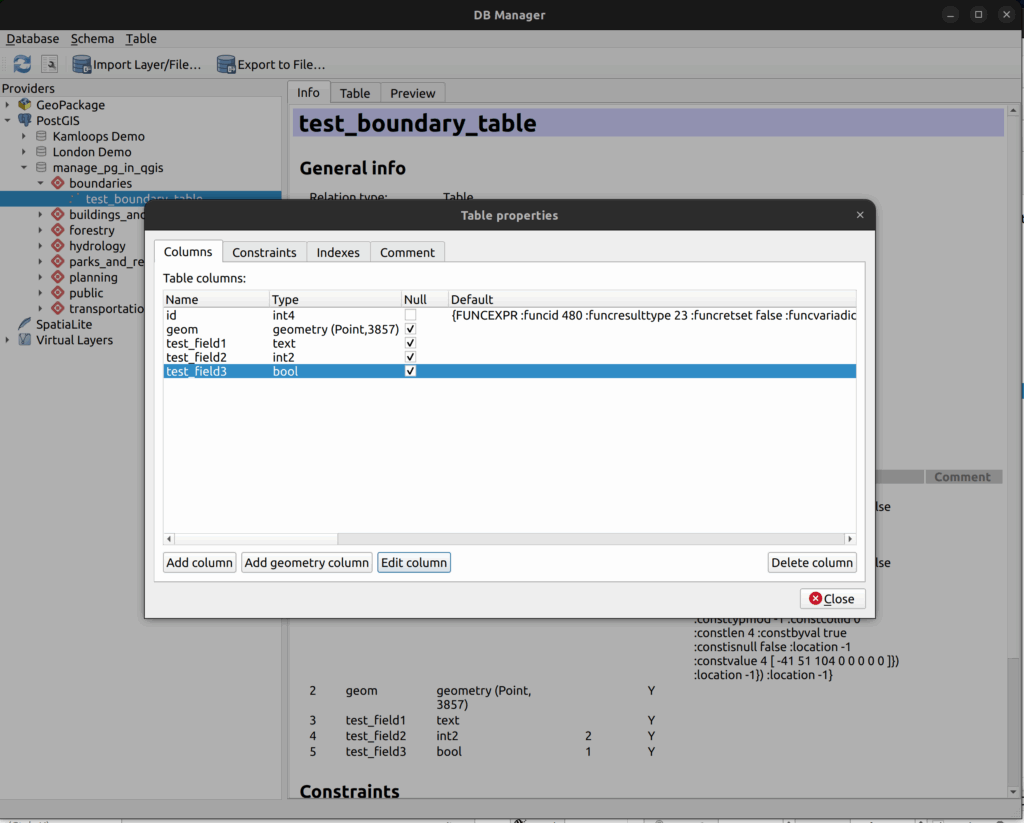
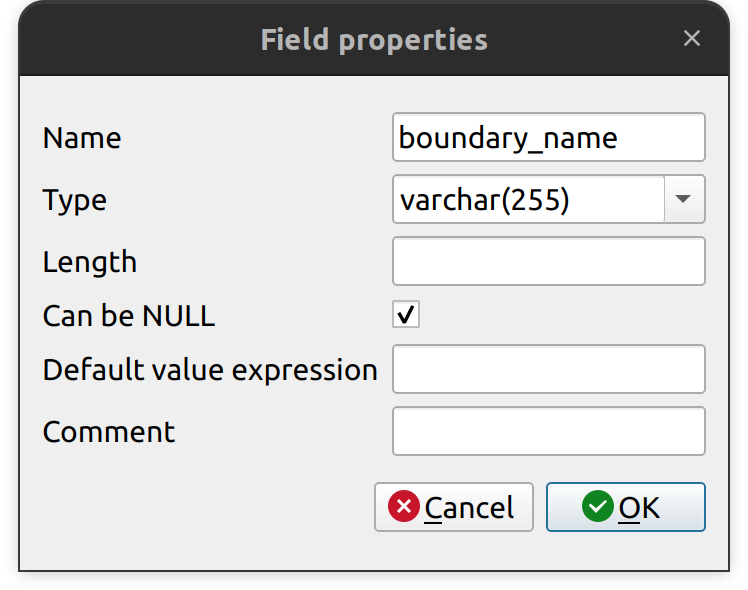
5. In the Field properties dialog box, change the Name to boundary_name and click OK.
6. Click Close on the Table properties dialog box and note that the field is now called boundary_name and it is data type varchar(255).
Task 10.2: Add a new field
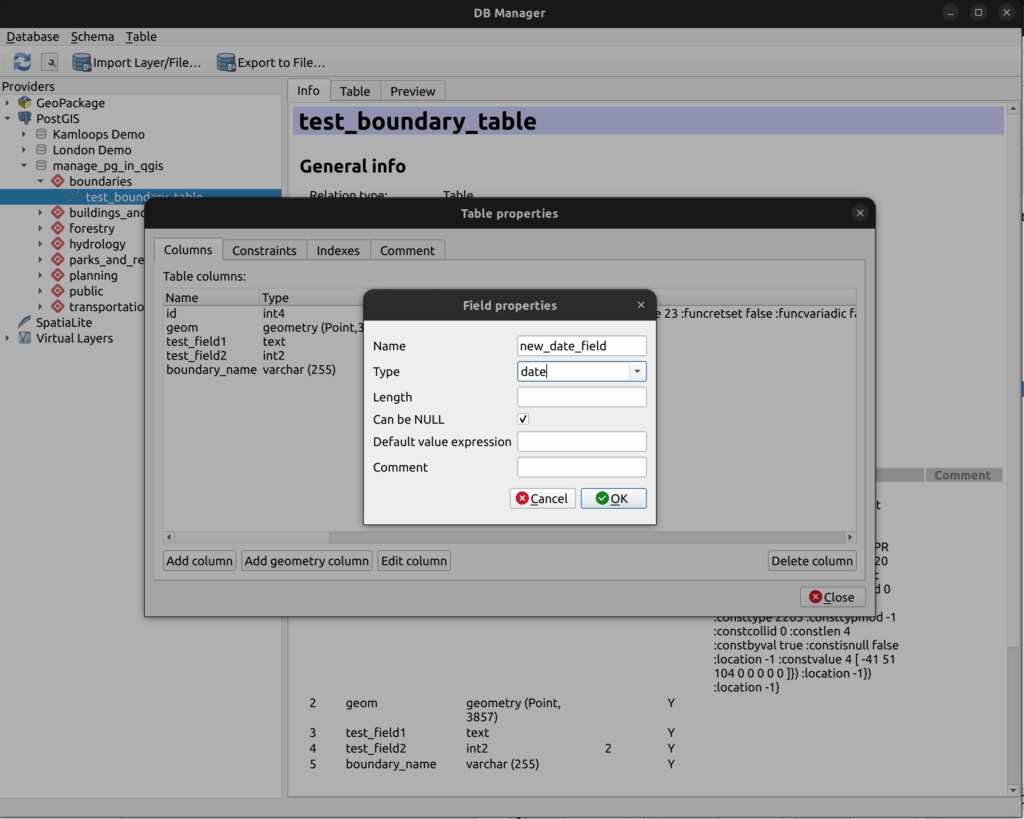
1. With the test_boundary_table still selected in the DBManager, on the top menu click Table > Edit Table to open the Table properties dialog box.
2. Click the Add Column button. In the Field properties dialog box, enter new_date_field as the Name and make the Type date.
3. Click OK and then click Close.
4. You should now see a new field called new_date_field that is type date
Task 11: Add a spatial index to an existing table
Spatial indexes in PostGIS accelerate spatial queries by allowing the database to quickly filter and retrieve only the geometries that are likely to interact with a given spatial condition, such as intersection or containment. For optimal performance in QGIS, it is recommended to always have a spatial index for each layer.
1. In QGIS, open the DB Manager and expand the manage_pg_in_qgis database and then expand the planning schema.
2. In the planning schema, click on the table test_table2 that was created in a previous step. Notice that on the right panel, it says “No spatial index defined (create it)”.
3. Click on “create it” to generate the spatial index.

How can we help?
Contact us today to schedule a free consultation with a member of our team.