
Create and Edit Geospatial Data in QGIS
This tutorial demonstrates how to create and edit geospatial data in QGIS. Specifically, you will learn how to create geospatial data in QGIS from scratch, draw (i.e. digitize) features, edit the geometry of new and existing geospatial features, and create/calculate new feature attribute data.
What You’ll Learn in this Tutorial
- Map features including houses and roads in a new subdivision in London, Ontario
- Tools and concepts learned:
- Create brand new geospatial data files, and modify the geometry of features using editing tools
- Calculate attribute data using the Attribute Table and Field Calculator
- In this tutorial, you will learn how to create point, line, and polygon shapefiles and digitize features using the Editing Panel. Additionally, you will learn how to edit existing geometries.
Prerequisites
1. Create a New QGIS Project
- Open QGIS 3.x or create a new project if it is already opened.
- On the Browser panel, expand XYZ Tiles and add OpenStreetMap to the map canvas. Note that the project CRS (visible in the bottom right corner) is automatically set to EPSG:3857 (Pseudo-Mercator).
- Expand the tutorial folder and add the shapefile new_subdivision.shp to the map.
- Right-click on the new subdivision layer in the Layers panel and select Zoom to Layer(s). Once you zoom into the area, turn off the layer by unchecking it in the layer panel.
- Save the project to the same folder that contains the new_subdivision shapefile. On the top menu, click Project > Save As and enter the project name “Creating and Editing Geospatial Data with QGIS”. Click the Save button. You should now see the QGIS project in the folder on the Browser panel.
2. Create New Shapefiles
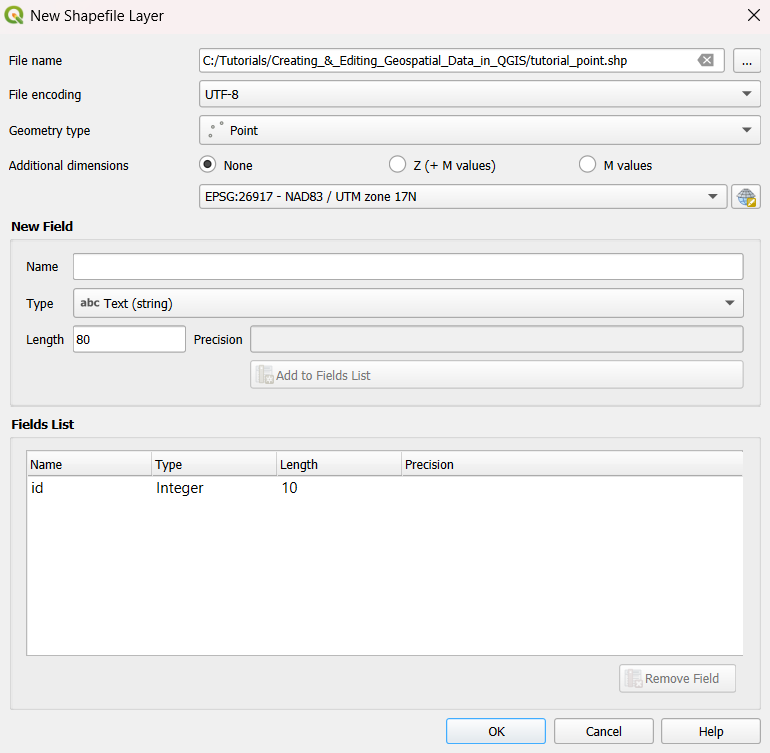
In the Browser panel, create a new shapefile in the tutorial folder by right clicking on the folder and select New then Shapefile.
- Name the new file tutorial_point.shp
- Set the geometry type to point.
- Set the CRS to EPSG:26917.
- Press OK.
- Repeat steps 1-4 but create a shapefile called tutorial_line.shp with a LineString geometry.
- Repeat steps 1-4 but create a shapefile called tutorial_polygon.shp with a Polygon geometry.
3. Edit the New Point Layer
- Edit the point layer by selecting it in the layer panel and then pressing the Toggle Editing on the toolbar area. Alternatively, you can also right-click and click toggle editing. When the toggle editing button is pressed, the Add Point Feature tool and the Vertex tool on the digitizing toolbar at the top will become available.
- Click the Add Point Feature tool, then click on one of the houses on the OSM basemap.
- A popup will appear. Enter 1 for the id value and press ok.
- Commit the changes to the Shapefile by pressing the save button on the editing panel.
- Turn OFF the editing session by clicking on the Toggle Editing button. You have now created your first feature!
- To create point features representing all houses in the new subdivision, repeat steps a through d for each house footprint on the base map. Enter a new id value for each iteration (e.g. 2, 3, 4…).
4. Edit the Line Layer
Toggle editing on the line layer to digitize the roads in the new subdivision. Do the following:
- Toggle editing on the line layer.
- Click the Add Line Feature button and then click on the map at the starting position, such as a road intersection.
- Follow the road and click as you go – more vertices are often needed to capture curved features like roads. When you get to the end of a road, right click and the attribute form will appear. Enter 1 for the id value and click OK.
- Save the edits and toggle off the editing session.
5. Edit the Polygon Layer
Toggle editing on the polygon layer to digitize the wooded areas in the new subdivision. Do the following:
- Toggle editing on the polygon layer
- Click the Add Polygon Feature button and then click on the map at the starting position.
- Follow the perimeter of the wooded area and left click at each corner.
- One you add the last corner, right click to show the attribute form. Enter 1 for the id value and press OK.
- Save the edits and toggle off the editing session.
6. Use the Snapping Tool with the Line Layer
Go to View > Toolbars or right click in the grey space next to any button on the toolbars at the top to add the Snapping Toolbar to the main toolbar. This will be used to add additional lines and make sure that the start/end of lines all connect.
- Click the Enable Snapping button (looks like a red magnet).
- On the same toolbar, set the first option to “Active Layer” – this means that when creating a new feature, it will only snap to that layer. If you want to snap to other layers, select All Layers or go into the advanced configuration.
- Toggle editing on the line layer and click Add Line Feature.
- Hover your mouse over the end of the lad line that was created and note what happens. Left click to start a new line and the end of the previous line.
- Digitize the road and right click the end of the line segment.
- Save the edits and toggle editing off.

7. Modify the Geometry of Existing Polygons
- Toggle off snapping on the Snapping Toolbar
- Toggle Editing on the polygon layer.
- On the editing toolbar, select the Vertex Tool.
- Hover your mouse oven an existing vertex of the polygon.
- Left click to select it.
- Move your mouse to select the new position and left click.
- Save the edits on the Editing Toolbar and toggle editing off.
- Continue digitizing roads and any other polygons in the new subdivision.
8. Calculate the Area of Each Polygon
To calculate the area of each polygon, open the attribute table and toggle editing – note that you can also edit the attribute data in the Attribute Table.
- Click on the Open Field Calculator.
- For Output field name, enter “area_sqm”.
- Change the field type to Decimal.
- Set field length to 10 and the precision to 2.
- In the expression window, enter $area
- Press OK.
- Save the edits and toggle editing off.

How can we help?
Contact us today to schedule a free consultation with a member of our team.