
Connect to Geoserver WMS and WFS in QGIS
This tutorial explains how to connect to Geoserver in QGIS, namely WMS and WFS service endpoints.
1. Geoserver Service Endpoints
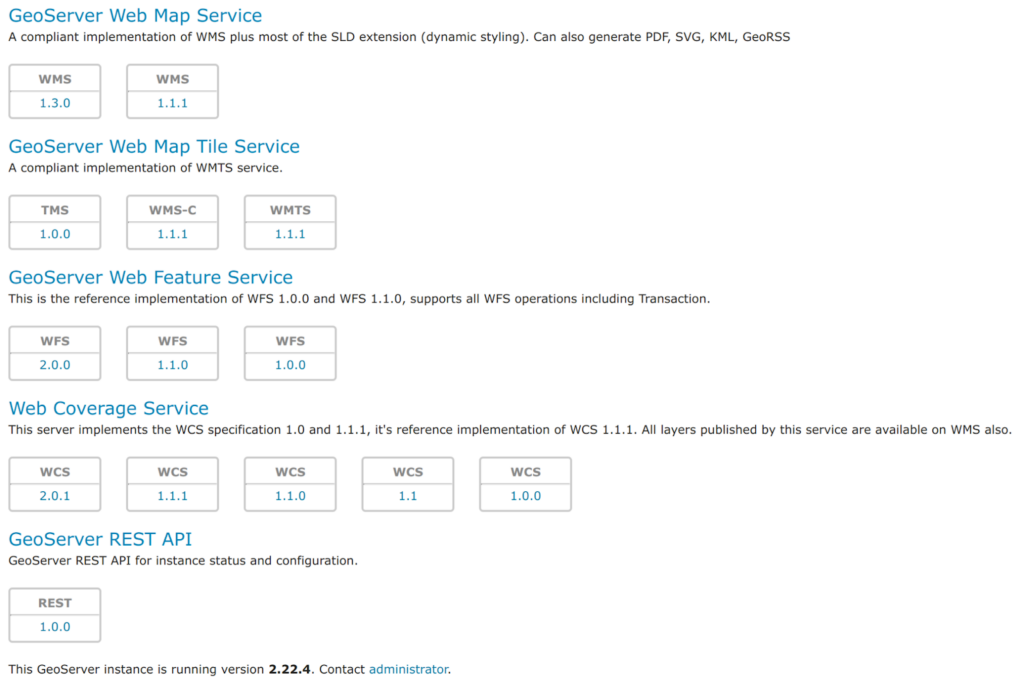
By default, Geoserver supports a number of different service endpoints and versions of them. The list of available services can be found on the Geoserver landing page. To get an endpoint URL, simply right-click on the desired service link and click “Copy Link Address” in Chrome or “Copy Link” in Firefox.
2. WMS Endpoints
The following instructions are to connect to a WMS/WMTS endpoint.
- Open QGIS and open the Data Source Manager (Layer > Data Source Manager).
- In the Data Source Manager, click on WMS/WMTS on the left side.
- To create a new connection, click on the New button.
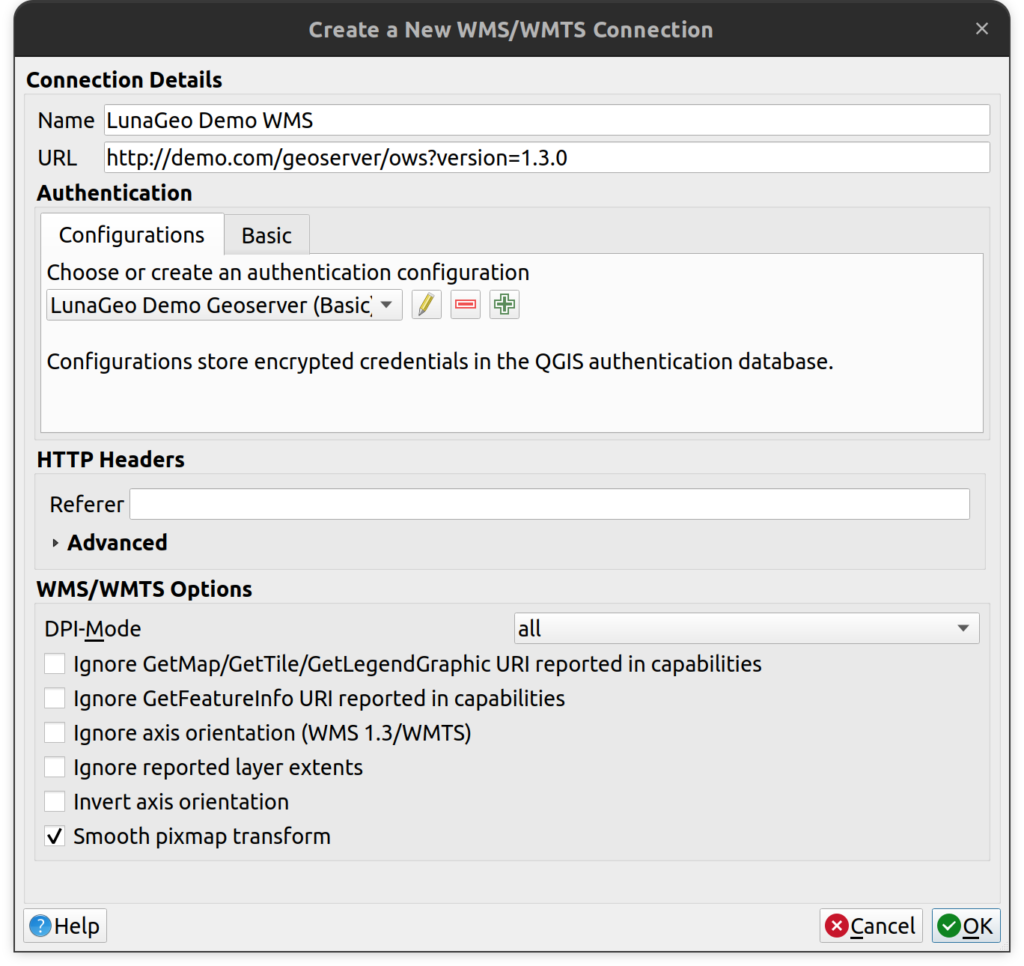
- Enter the following parameters:
- Name: Type a name for the connection.
- URL: Enter your server’s WMS/WMTS URL (copied from the Geoserver landing page). Note that if you use a WMS endpoint, you will only have access to WMS layers, and if you connect to WMTS you will only have access to WMTS layers.
- DO NOT USE BASIC AUTHENTICATION. The second tab in the Authentication section with the label “Basic” should not be used.
- Under the Authentication section, click on the “Configurations” tab. All connections must be made to Geoserver using a QGIS configuration, which is a way to save credentials for different connections inside the QGIS profile.
- Create a New Connection. Click on the green plus sign button to create a new connection.
- Master Password. If prompted to enter a master password, do so and keep the password in a safe location (e.g. a database manager). The master password in QGIS is only used to protect local passwords. Users will likely never use it again, but keep it handy just in case.
- Name: give the authentication record a name (e.g. Production Geoserver).
- Basic Authentication. Select basic authentication from the dropdown.
- Username: enter the username.
- Password: enter the password. Click the Show checkbox to make sure there are no trailing spaces in your password.
- Authentication ID: this is VERY IMPORTANT. Enter the Geoserver authentication ID for your organization.
- Click Save to close the new Authentication dialog.
- Click OK to save the new connection.
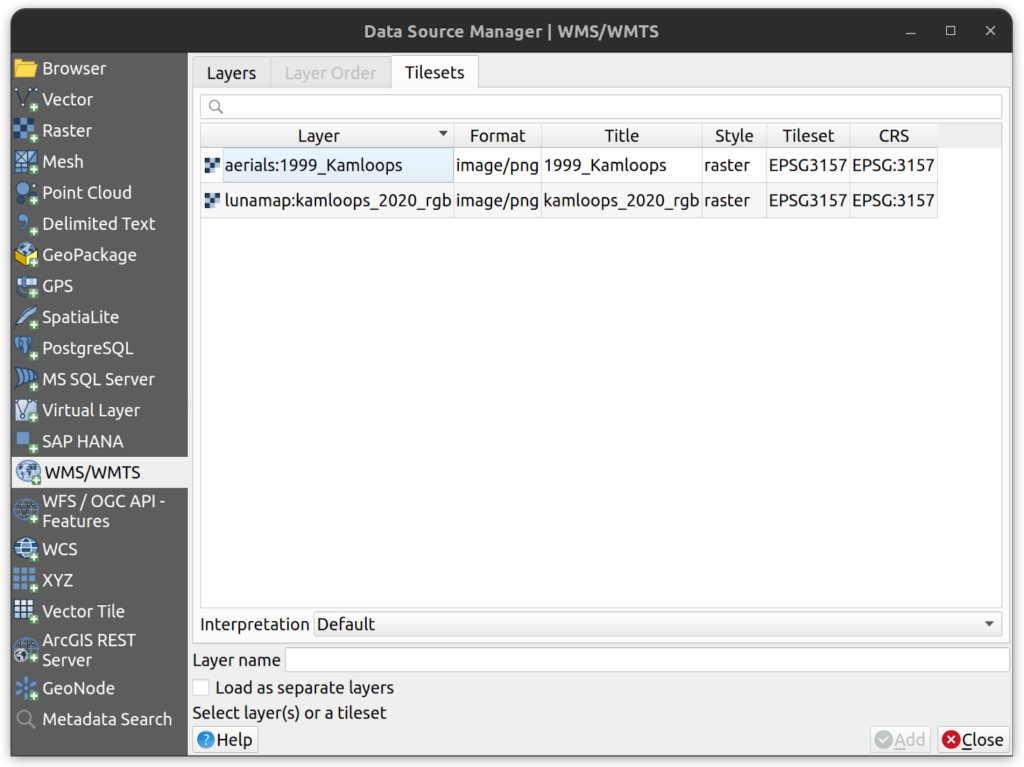
- Click the Connect button to see a list of available layers. You should now see a list of available layers. WMS layers will list in the “Layers” tab while WMTS layers will list in the “Tilesets” tab.
- Click on a layer then click on the Add button to add it to your project (see known bug below).

3. WFS Endpoints
WFS allows users to load actual vector data from Geoserver and enforce whatever permissions are defined for the data and service – more on security and permissions in Lesson 5. The following instructions are to connect to Geoserver’s WFS endpoint and load vector data into a new QGIS project.
- Open QGIS and open the Data Source Manager (Layer > Data Source Manager).
- In the Data Source Manager, click on WFS/OGC API Features on the left side.
- To create a new WFS connection, click on the New button.
- Enter the following parameters:
- Name: Type a name for the connection (anything you wish).
- URL: Enter your server’s WFS URL (copied from the Geoserver landing page).
- DO NOT USE BASIC AUTHENTICATION. The second tab in the Authentication section with the label “Basic” should not be used.
- Under the Authentication section, click on the “Configurations” tab. All connections must be made to Geoserver using a QGIS configuration, which is a way to save credentials for different connections inside the QGIS profile. If you have an existing Geoserver authentication record, do not create a second one. The same authentication record can be used for WMS, WFS, and any other service from the same Geoserver. If you do not have an existing authentication record, proceed to the next step.
- Create a Geoserver authentication record (optional if not already created).
- Create a New Connection. Click on the green plus sign button to create a new connection.
- Master Password. If prompted to enter a master password, do so and keep the password in a safe location (e.g. a database manager). The master password in QGIS is only used to protect local passwords. Users will likely never use it again, but keep it handy just in case.
- Name: give the authentication record a name (e.g. Production Geoserver).
- Basic Authentication. Select basic authentication from the dropdown.
- Username: enter the username.
- Password: enter the password. Click the Show checkbox to make sure there are no trailing spaces in your password.
- Authentication ID: this is VERY IMPORTANT. Enter the Geoserver authentication ID for your organization.
- Click Save to close the new Authentication dialog.
- Click OK to save the new WFS connection.
- Click the Connect button to see a list of available layers. You should now see a list of available layers.
- You can filter the layers using the textbox.
- Click on a layer then click on the Add button to add it to your project.


How can we help?
Contact us today to schedule a free consultation with a member of our team.